Friday, August 1, 2014

Petunias vs Chickens

Our chickens free range most of the time.  They love their free time and run to the gate when they see me coming in the mornings to let them out.


Contrary to popular belief, or maybe just because they are contrary, our chickens avoid the gardens, pastures and fields and stick to the tree line and the brush.  I guess the instincts of their jungle fowl ancestors run strong.


They also love to forage around the house, especially the front of the house.  A few weeks ago, I posted this picture of Ringo on Facebook, to explain why this flower pot had not yet been planted.


Shortly after I took this, I decided that no rooster was going to stop me from growing flowers in this pot.  After all, I had grown flowers in it last year.  I bought and planted a few petunia plants.

This is what they look like today.


Note that only one side of the planter remains planted.  The chickens decided that only one side of the pot should actually have plants.  I do not agree with the artistry of their design.

Not only does Ringo still jump up in there, but since I planted, the girls like to get in there and scratch up and throw the plants out.  Depending on how quickly I find the uprooted plants they are replanted or tossed in the compost.  This past week, they have left the remaining plants alone, so either I'm winning the petunia war or, they're simply waiting and biding their time, planning a sneak petunia attack when I'm not looking.

This hanging planter was planted the same day as the other pot.


Now this is what the other petunia pot should look like!


Happy and Cheerful!


Have a Happy Friday everyone and a lovely weekend.

Kim Klassen dot Com

From The Farm Blog Hop

Tuesday, July 29, 2014

Herb Bouquet


Basil and Summer Savory Bouquet 1 Photo by Tori Beveridge AHWT


A bouquet of Emily Basil (more compact version of Genovese), Basil Genovese Red Freddy and Summer Savory, picked fresh from my herb garden in a sundae dish instead of a vase, can be delicious to the eyes.


Basil and Summer Savory Bouquet 2 Photo by Tori Beveridge AHWT


“Texture


Kim Klassen Textures used:  Top Photo:   Jamal from August Trio,  Bottom Photo:  Savor from August End


Friday, July 11, 2014

Planting For Bees

We are planning to get bees.  It's been something I've wanted to do, but not something that I think should be rushed into.  I want my garden to welcome them when they arrive.  So I've been planting.

Bees like blue and yellow flowers, so I  have been keeping that in mind.  I know they'll love the calendula, coreopsis, purple phlox, delphiniums, roses, hyssop, lavender and borage in my garden.

Borage Photo by Tori Beveridge AHWT
Borage

I have planted bergamot, which is also called bee balm.  Because bergamot is red, the bees may not be as attracted to it, but that's fine with me because hummngbirds and butterflies are constant visitors to the shaggy red blooms.

Bergamot Photo by Tori Beveridge AHWT
Bergamot also called Bee Balm

The "buzziest" place in my gardens right now, though has to be the kitchen garden.  The squash blossoms are humming.

Bee in Squash Blossom Photo by Tori Beveridge AHWT
Bee in a Squash Blossom

Linking to:

Kim Klassen dot Com

Monday, July 7, 2014

Farm Fresh Eating - Garlic Scapes

Hi everyone!

This post was supposed to make it onto the blog last week at this time, along with a brief explanation of what ever happened to The Egg Diaries. 

Well.. what with the weather affecting our internet ( it rains 8 counties over and our internet goes down!  Someone explain this to me please! ) and then having to work outside after the rain to make up for all the rainy hours spent inside, with no internet, I have decided that it is too stressful to try to schedule something that should recur on a regular basis.  I will still be writing Egg Diaries, but they will be posted as I can instead of every Monday.  This way when Mother Nature strikes and I can't get online, I won't be stressing about it.

Anyway, while it was raining last Monday, I was using up the last of our garlic scapes.

Garlic Scapes?

If you have never heard of them you are not alone, although they are being seen more and more often at June Farmers' Markets 

I always knew I wanted to grow garlic.  We use so much of it.  I had romantic visions of garlic braids hanging in the kitchen, the garlic waiting to be used.

Reality check.  I couldn't grow soft neck garlic here, no matter how hard I tried.  All my attempts failed.  There would be no garlic braiding for me.  I'm stubborn.  I wanted garlic in my garden.  I was determined to grow it.  I researched and found out that soft neck garlic, the kind that can be braided and the most common kind of garlic sold in stores, because it stores and travels well, likes milder climates.  I would have to grow the hard neck varieties, which can handle the cold weather we get here in Illinois.

Okay.  No braiding but at least I'd have garlic.  Fast forward to this June and this scene.

Garlic Scapes Photo by Tori Beveridge
Garlic Scapes make a stunning display in the garden.

Not only did the hard neck garlic grow, it was beautiful!  The artist in me simply adores the curly scapes (the strong central stalk) that grew.  They were gorgeous!  And guess what?  Soft neck garlic does not grow these scapes!  I may not have braids but I will have these works of art to look forward to every June.

They are not only beautiful, but they are also edible!  Their flavor is milder and greener than the bulb garlic still growing in the soil.  Think of chives or young onion greens compared to cooking onions.

Garlic Scape Bouquet Photo by Tori Beveridge
Wouldn't a few bunches of these look gorgeous as center pieces on your table?

Seriously?!  I don't get one harvest from my garlic, but two!  Not being able to grow soft neck garlic here has turned out to be a blessing.  I couldn't be more thrilled with my hard neck garlic and their curly garlic scapes.

Cutting the scapes also makes good gardening sense.  By cutting the scapes, it allows the energy of the plant to go into growing the bulb, rather than growing the scape.  All of mine were cut over a few days time.  I had bunches and bunches of them.  I still have some!

The uses for scapes are as endless as the uses for garlic and they can be used in any recipe that calls for garlic.  You can also enjoy them raw, minced into salads, because of their mild flavor.

Garlic Scapes Simmering Photo by Tori Beveridge
Garlic Scapes simmering in "Garlic" Chinese Pork .

The lower stalks are quite rigid and hard (hard neck, remember), so cut them off and use the tender top curly ques.  I like to save and use a few of the stalks, cut into small pieces to add to red or white wine vinegar along with fresh herbs from my garden.  In a few weeks, I'll have lovely infused vinegars to use for salad dressings.

Garlic Scape Infused Vinegar Photo by Tori Beveridge
Garlic Scape Infused Vinegar

I made sure to make a pesto with them and freeze it, to be brought out to be eaten when our tomatoes ripen.

I hope you'll still be able to find garlic scapes at your local Farmers' Market.  If not, make sure to look for them next year.  If you're like me and have had problems growing garlic, look into the hard neck varieties and start planning to add them to your garden.  They'll be worth the wait.

Eat Fresh.  Eat Seasonal.  Eat Local.


Friday, June 27, 2014

Farm Fresh Eating - Chicken Wrap Casserole

At this moment, our garden is full of leafy greens which we love, especially spinach and beet tops.

If you don't know beet tops, they are the leaves that grow above the ground while the delicious ruby red beet roots are developing underground.  You eat them just like spinach, cooked or raw.  If you are not lucky enough to have them growing in your kitchen garden, look for them and for spinach at your local Farmers' Market.

Spinach and Beets grown from non gmo seeds Photo by Tori Beveridge

Our beets and spinach are growing side by side and were grown with non-gmo seeds from Mike The Gardener's Seeds of The Month Club. (which I adore so much I am now an affiliate for them...more about that later - clicking the link will take you to them for more info) 

Needless to say, we've been eating lots of fresh from the garden salads, combining the beet tops and spinach in "Spinach Salad" and tossing with lettuces in other green salads.  I love filling a bowl full of fresh picked spinach leaves, then pouring home made beef or vegetable soup over top, the spinach wilts and shrinks and adds delightful flavor to the soup.

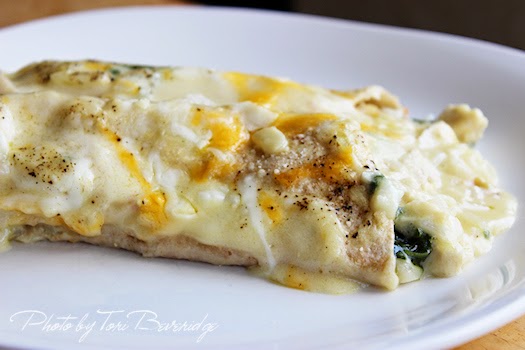
I also love to add spinach and beet tops to this delicious savory Chicken Wrap Casserole.

Chicken Wrap Casserole in The Pan Photo by Tori Beveridge

Chicken Wrap Casserole

Preheat your oven to 350 degrees.
Butter a 9 x 13 inch backing dish

1/3 cup butter
1 cup chopped onion
2 cloves garlic, minced
1/4 cup unbleached flour
2 cups chicken broth
1/2 cup cream (half and half is good) try to avoid ultra-pasteurized.
3/4 cup of grated cheddar cheese
3/4 cup of grated mozzarella cheese
1/4 cup grated parmesan cheese

3 to 4 cups of shredded leftover chicken or use a rotisserie chicken

Bunch of fresh spinach or beet tops or combination of the two.  I use a 4 cup pyrex liquid measuring cup and loosely pack it with the leaves.

10 medium corn or flour tortillas ( in the photos I have used whole wheat but corn are really delicious)

Melt the butter in a large skillet.  Add the onion and garlic and saute until soft and translucent, stirring often.
Add the flour and stir in well and cook for 2 - 3 minutes so the "floury" taste disappears, stirring constantly.
Slowly stir in the chicken broth until well combined and smooth.
Stir in the cream.
Add 1/2 cup of the cheddar cheese and 1/2 cup of the mozzarella cheese and half of the parmesan cheese, stirring until melted and well combined.
Remove 1 cup of the sauce from the pan and set aside.
Add the chicken to the pan.
Add the spinach and beet tops to the pan.
Cook until the spinach is wilted.
Remove from the heat.

I use a soup ladle (approx 1/2 to 3/4 cup) to spoon the chicken mixture into the center of each tortilla, then roll it up and place it in your prepared casserole dish.

Pour the 1 cup of reserved sauce over the wraps.
Sprinkle the rest of the cheese over the top, along with some freshly cracked pepper.

Bake for 20 minutes.

Serve with a fresh seasonal salad.

ENJOY!

Chicken Wrap Casserole Photo by Tori Beveridge


Eat Fresh.  Eat Seasonal.  Eat Local.

Tuesday, June 24, 2014

Daylily


It is not growing like a tree
in bulk doth make man better be;
Or standing long an oak, three hundred year,
To fall a log at last, dry, bald, and sere,
A lily of a day
is fairer in May
Although it fall and die that night,
It was the plant of flower and light,
In small proportions we just beauties see;
And in short measures, life may perfect be.

– Benjamin Johnson


The Rainy Day texture was used on the photo above.


Monday, June 16, 2014

The Egg Diaries - Mulberry Clafouti

The Egg Diaries - A weekly journal documenting my egg use, to help myself and others use all the beautiful eggs, our hens lay for us.  Now, a Blog Hop, so you can join in by sharing the ways in which you use your eggs.  Link up at the bottom of the page.

Last week at this time, we were in the middle of some unstable weather, which caused out internet to be very unstable.  I was unable to post last week's Egg Diaries because of it.  Our unstable internet is one of the negatives of living in the country, but is one I can overlook and live with.

Ricotta Lemon Arugula Quiche
Ricotta Lemon Arugula Quiche - Recipe by Martha Stewart linked below
All of the spring greens we planted in the garden are ready for harvesting and we've been enjoying baby spinach, red mustard, red romaine and other lettuce, endive and arugula.  I tried a Martha Stewart recipe for Ricotta Lemon and Arugula Quiche that I had pinned on Pinterest.  It was light and fresh and if you love the spicy, peppery taste of arugula, you'll enjoy it.  The recipe is linked below.

Our mulberry trees are laden with fruit.  I absolutely love mulberries!  I've been making mulberry jam and, of course baking with them to use eggs.  I used them in Pavlova last week.  If you missed my post it's linked below.

Mulberry Clafouti is a favorite recipe because it's fast and easy.  My recipe is at the bottom of the page.  Clafouti is traditionally made with cherries, so you can substite cherries or different berries in this recipe.

The Egg Diaries

Monday June 9th

3 Eggs - Breakfast:  Sausage Cheese and Egg Breakfast Sandwiches on Toasted English Muffins, Orange Juice
0 Eggs - Lunch
0 Eggs - Dinner
2 Eggs - Cooked and fed to the dogs

5 Eggs Used

----------------------------------------------

Tuesday June 10th

5 Eggs - Breakfast:  French Toast, Bacon, mulberries
0 Eggs - Lunch
8 Eggs - Dinner:  Pork Roast with roasted potatoes, carrots and onions, green beans  Pavlova ( with lemon curd, fresh strawberries and mulberries)

13 Eggs Used

----------------------------------------------

Wednesday June 11th

0 Eggs - Breakfast
0 Eggs - Lunch
2 Eggs - Dinner:  Ricotta Lemon and Arugula Quiche, Spring Greens Salad
2 Eggs - Cooked and fed to the dogs

4 Eggs Used

----------------------------------------------

Thursday June 12th

0 Eggs - Breakfast
4 Eggs - Lunch:  Egg Salad Sandwiches, vegetable sticks, strawberries
0 Eggs - Dinner

4 Eggs Used

----------------------------------------------

Friday June 13th

0 Eggs - Breakfast
0 Eggs - Lunch
4 Eggs - Dinner:  Cheeseburger Macaroni Casserole, Spring Greens Salad,  Mulberry Clafouti (Recipe is below)

4 Eggs Used

----------------------------------------------

Saturday June 14th

4 Eggs - Breakfast:  Cheese Omelettes, toast, strawberries
0 Eggs - Lunch
0 Eggs - Dinner
8 Eggs - Scrambled and fed to the chickens

12 Eggs Used

----------------------------------------------

Sunday June 15th

5 Eggs - Breakfast:  Steak and Fried Eggs, Toast, Cranberry Orange Juice
0 Eggs - Lunch
0 Eggs - Dinner

5 Eggs Used

----------------------------------------------


TOTAL:  47 EGGS USED

----------------------------------------------


Mulberry Clafouti Photo by Tori Beveridge
Mulberry Clafouti


Mulberry Clafouti

2 cups mulberries
3 eggs
1 egg yolk
1 cup sugar
1 cup milk
1 teaspoon vanilla extract
3/4 cup flour
Pinch of salt

Preheat oven to 350 degrees.
Grease an 8 x 8 square pan

Put your mulberries in the pan and arrange so they are spread evenly.

Combine your flour and salt and set aside.

Beat the eggs and the egg yolk together until light.
Add the sugar and beat.
Beat in the milk and vanilla.
Add the flour mixture and beat until the mixture is well combined, light and airy.

Pour the mixture over the berries.

Bake for 45 minutes or until the top is golden and the top springs back when touched.

Cool.  ( We like it cold, others like to serve it warm)

Dust with icing sugar if you like to make a pretty presentation. (optional - we find it sweet enough without the added sugar)

Serve with whipped cream if desired.

Enjoy!