Saturday, March 24, 2012

Dandelion Wine

"....................This glorious day to squeeze, save, and shelve
in dandelion wine, fermented, distilled, stocked.

Basement crypt will shelter, protect, and secure
deep joy. Preserve, keep, lock.


.....................Dandelion life. Uncap. Drink down. Live!"

Excerpts from the poem, 'Dandelion Wine' by Ray Bradbury

Ahhh Spring! Everything is bursting into bloom.

The redbud is in bloom.


The ground phlox is in bloom.


The dandelions are in bloom.


If I was still living in the city, that would have sent me straight out with the weed killer, to destroy any evidence of the horrible weed.  Heaven forbid we let them go to seed.  The neighbours would have been up in arms and we would have been "those people".

There will be no weed killer this year.   I look at dandelions with a new attitude.  Those happy, sunny, yellow flowers are going to become wine.

I have always wanted to make dandelion wine.  I don't know why.  I've never tasted it, so I don't know if it's good or not.  I suppose it's the romantic, old "fashionedness" of it that appeals to me.  It's something you would read about in a book set in an idyllic countryside setting.  So, when I was on the phone with my mother yesterday and looked out the window and saw dandelions everywhere, I decided this was the year.  This was the year I would make dandelion wine.


Mr B. (my husband) thinks I am crazy.  "The skunks and the deer and rabbits and mice and all the other animals, walk around out there and use the field as their bathroom."

"City boy."  I said.

"There's bugs everywhere and in the flowers."  he said. 

"I'll wash the flowers." I said.  "You're such a city boy." 

He remains dubious.  I'm sure he'll appreciate it in the end.

My online research turned up quite a few recipes.  I haven't decided which one I am going to ultimately use, but this one looks good and it had the brilliant tip to pick and freeze the blooms until you are ready to make the wine.  

Our bulldog puppy, Otis, came dandelion picking with me this morning.


I've started.  As you can see, I picked only the heads/blooms and no stems.  


When I have enough blooms picked, I'll share which recipe I'm using.  Until then if any of you make dandelion wine and have a good recipe and are willing to share it, or have tips for me, I'd be glad to hear them.

In the meantime...


I'm linking this post to an awesome link party:  
Farmchicks Farm Photo Friday


I was so happy to see that you don't have to live on a farm to participate.  Country living and a farm heart is all that is needed.  Check it out.  


Thursday, March 22, 2012

How To Start Composting


In an earlier post I told you that I had bought a compost bin and set it up near our soon to be vegetable garden.  I know I'll need to add fertilizer to my garden.  Why not make it myself?  I have all the necessary ingredients to make wonderful compost to fertilize my garden.  Let me share with you how simple it is to make your own compost.

Tuesday, March 20, 2012

Early Spring Blossoms & Word Art for You

Happy first day of spring to everyone!

I couldn't help but remember that this was the first day of spring, when I walked the dogs this morning.  Everywhere I looked I was reminded and it inspired me to create something for you.

Our peach and cherry trees are in bloom.


Our hawthornes are also in bloom.


Our forsythia which is always first to bloom definitely wasn't alone this year.


And.. our neighbor's goat had kids.  They are about 2 weeks old now.


I was so inspired when I came home that I made a printable Spring Word Art to share with you.


Simply click the preview to open the full size art, then save it to your computer and print it out.  I printed mine at 8 x 10 inches.  Please enjoy it for your own personal use only.  No commercial use allowed.

Enjoy and Happy Spring!  


Friday, March 16, 2012

From Dog Crate to Kitchen Counter

We have a HUGE dog crate in our kitchen.

It's the Gorilla Tough XLarge (28"W  X  48"L  X  35"H) model, which we had had to buy for our Chow/Rott mix, Pamunky, when she outgrew the smaller crate we had.  It had to be the Gorilla Tough crate because she had figured out how to escape from the other wire crate we had and attractive furniture style crates make lovely chew toys.


I think you'll agree that it is not the most attractive kitchen decor.  Add this to the fact that we have a horribly  laid out kitchen with very little counter space or storage space. (I swear the people who designed this kitchen, never cooked a day in their life and brought home take out or ate out every single day.)  I had to find a way to make the crate work for us, beyond confining the dog.  Seriously, I store my baking pans in my oven and when I need to use the oven, I have no place to put the pans, so they end up being put on top of the dog crate.  Useful, yes.  Attractive, no.

My solution was to make the dog crate look a little less like a dog crate and more like a kitchen feature.

This was a totally spur of the moment project.  Something had to be done and I had to do it NOW.  I was over looking at that dog crate everyday.

I didn't have any plywood, but remember all those delivery boxes, I told you I had?  I measured the top of the crate inside the wire hooks, broke down a large cardboard box, then cut it to fit and laid it on top of the dog crate.  The cardboard will help with the weight distribution of all those pans I have stored in my oven.  Who am I kidding?  I will have to go and get plywood cut to size as soon as possible.  If you aren't putting anything heavy on top of your dog crate, a broken down cardboard box will do.


It looks even worse than it did before!   Not for long.  I had an old white rectangular tablecloth, which I wasn't using, so I laid it over the top of the crate.  Then I got my recipe box, cookie jar, some cooking magazines, and flowers and decorated the top of the crate.  Oneida, one of our seven cats, had to jump up for the picture.


I think you'll agree with me, that this is so much better.  It actually looks like it belongs in the kitchen.  I am not going to show you what it looks like with all the pans on top of it.  Kitchen explosion!

To improve upon my new counter, I'll purchase the plywood.  Also, I'll buy either a good quality vinyl tablecloth or some oilcloth to make a new cover, because the cats do love to jump up there for some reason and they shed.  Bleh.   The vinyl or oilcloth will clean much easier.


Pin It

Wednesday, March 14, 2012

First Things First Vegetable Garden

We're not new to our home, although it does seem like just yesterday that we moved in.

We moved from the big city of Chicago to the middle of nowhere, Illinois, almost seven years ago. In all that time, we've been sitting on just under 3 acres of pasture and woodland and haven't done a thing with it, except for planting a few herbs, flowers, bushes, fruit trees and the odd vegetable.

It's time to get serious and stop day dreaming about a romantic Tasha Tudor homestead and start creating my own.

My husband is planning on leaving the job, that brought us here, in the very near future and will be self employed.  Money is going to be tight.  It's a bit scary but I support him one hundred percent and am determined to help in any way possible.  One of those ways is to discover how to make use of the land we have and make it work for us.

So, first, I'd like to take back the garden plots from the weeds and turn them into proper vegetable gardens.


Hey!  I can hear you laughing from here.  I know.  I know.  It's a daunting task.  It's a mess!  

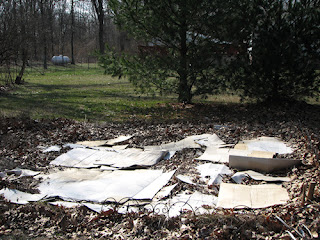
What's with the cardboard?

Well... Last fall, I read that wet newspapers laid over the weeds in your garden will smother them and they won't grow through it.  I also read that you could do the same with cardboard.   I had lots of delivery boxes in the burn pile, ( a city girl in the country with no big stores gets lots of deliveries) but only a few copies of our local town newspaper, so I decided to use the boxes.  I recruited my husband to help and we went out, broke down the boxes, covered the garden with them, then thoroughly soaked them.  At that point my husband had had enough "gardening" and called it a day.

We weren't finished.  In the book I read, it said to weigh the newspaper down and/or spread mulch over it.  We didn't have mulch but we do have bricks and cinder blocks,which I had planned on using.  I wasn't, however, up to slugging them across the property and placing them in the garden and my husband had already disappeared into the house.  The cardboard would have to stay put by itself.  I highly doubted that it would.  Surprisingly, the cardboard stayed where it was laid all winter. It lay there, either wet or frozen as the wind swept the oak leaves out of the woods behind us to get caught in the cardboard.  It wasn't until this spring when all the early tornado activity started that the cardboard started flying across the property, sending me and the dogs to chase it and retrieve it.  I think there's still a couple of pieces in the woods. 

I believe it's going to work.  We'll remove the majority of the leaves and build raised beds on top of the cardboard.  That should keep the weeds down nicely.  We'll mulch or put pavers ( I have DIY paver molds) down between the beds. 

I have our composter close by, to make it easy to add compost to the garden.


I didn't want a compost pile because of all the wild animals that frequent our property.  We back onto Sand Ridge State Park, and an open compost pile would be an open invitation for some of them to a buffet. 

The challenge is on.  I know you might have your doubts about that garden and I don't blame you.

I'll keep you posted.