Showing posts with label recipe. Show all posts

Friday, June 27, 2014

Farm Fresh Eating - Chicken Wrap Casserole

At this moment, our garden is full of leafy greens which we love, especially spinach and beet tops.

If you don't know beet tops, they are the leaves that grow above the ground while the delicious ruby red beet roots are developing underground.  You eat them just like spinach, cooked or raw.  If you are not lucky enough to have them growing in your kitchen garden, look for them and for spinach at your local Farmers' Market.

Spinach and Beets grown from non gmo seeds Photo by Tori Beveridge

Our beets and spinach are growing side by side and were grown with non-gmo seeds from Mike The Gardener's Seeds of The Month Club. (which I adore so much I am now an affiliate for them...more about that later - clicking the link will take you to them for more info) 

Needless to say, we've been eating lots of fresh from the garden salads, combining the beet tops and spinach in "Spinach Salad" and tossing with lettuces in other green salads.  I love filling a bowl full of fresh picked spinach leaves, then pouring home made beef or vegetable soup over top, the spinach wilts and shrinks and adds delightful flavor to the soup.

I also love to add spinach and beet tops to this delicious savory Chicken Wrap Casserole.

Chicken Wrap Casserole in The Pan Photo by Tori Beveridge

Chicken Wrap Casserole

Preheat your oven to 350 degrees.
Butter a 9 x 13 inch backing dish

1/3 cup butter
1 cup chopped onion
2 cloves garlic, minced
1/4 cup unbleached flour
2 cups chicken broth
1/2 cup cream (half and half is good) try to avoid ultra-pasteurized.
3/4 cup of grated cheddar cheese
3/4 cup of grated mozzarella cheese
1/4 cup grated parmesan cheese

3 to 4 cups of shredded leftover chicken or use a rotisserie chicken

Bunch of fresh spinach or beet tops or combination of the two.  I use a 4 cup pyrex liquid measuring cup and loosely pack it with the leaves.

10 medium corn or flour tortillas ( in the photos I have used whole wheat but corn are really delicious)

Melt the butter in a large skillet.  Add the onion and garlic and saute until soft and translucent, stirring often.
Add the flour and stir in well and cook for 2 - 3 minutes so the "floury" taste disappears, stirring constantly.
Slowly stir in the chicken broth until well combined and smooth.
Stir in the cream.
Add 1/2 cup of the cheddar cheese and 1/2 cup of the mozzarella cheese and half of the parmesan cheese, stirring until melted and well combined.
Remove 1 cup of the sauce from the pan and set aside.
Add the chicken to the pan.
Add the spinach and beet tops to the pan.
Cook until the spinach is wilted.
Remove from the heat.

I use a soup ladle (approx 1/2 to 3/4 cup) to spoon the chicken mixture into the center of each tortilla, then roll it up and place it in your prepared casserole dish.

Pour the 1 cup of reserved sauce over the wraps.
Sprinkle the rest of the cheese over the top, along with some freshly cracked pepper.

Bake for 20 minutes.

Serve with a fresh seasonal salad.

ENJOY!

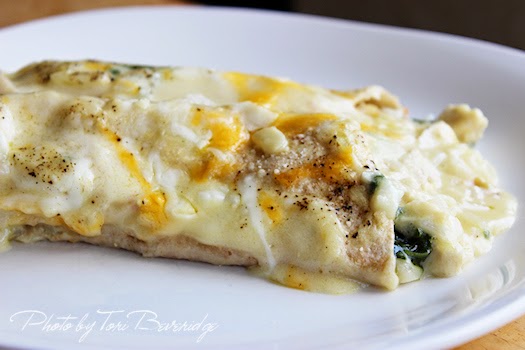
Chicken Wrap Casserole Photo by Tori Beveridge


Eat Fresh.  Eat Seasonal.  Eat Local.

Tuesday, April 29, 2014

The Egg Diaries - April 21st to April 27th

The Egg Diaries - A weekly journal documenting my egg use, to help myself and others use all the beautiful eggs, our hens lay for us.

I truly meant to get this up yesterday, but the weather wasn't co-operating.  We had bad thunderstorms, (luckily no tornadoes) and our internet doesn't do well when there is even a hint of rain in a radius of about four counties around us.  

As promised The Egg Diaries will now be a blog hop, where you can share your favorite egg stories, egg recipes, egg in disguise recipes, egg trivia, egg crafts, egg photographs, anything to do with eggs.  This being a new blog hop, it will, I am sure, go through a phase with very few or no posts, but I'll keep inviting you to post and share all things egg with us.

You can link up with the tool at the bottom of this post.

If you are joining in please link to this blog in your post and feel free to use this button.


The Egg Diaries Blog Hop Button At Home With Tori


I always make too many mashed potatoes.  Mashed potatoes are really not wonderful reheated, but they are delicious when you make them into Potato Pancakes.  I love Potato Pancakes.  If you have never tried them, you should.  They are easy to make and yummy served with sour cream, or for a hearty breakfast, serve them topped with a poached egg, like I did this week.  You'll find my recipe for Potato Pancakes at the bottom of the page.


Potato Pancakes Topped with Poached Eggs Photo by Tori Beveridge
Potato Pancakes topped with poached eggs and served with bacon.


The food items I used eggs in, are in bold type.  They do not link to recipes unless stated.

The Egg Diaries


Monday April 21st

0 Eggs - Breakfast:  Leftover homemade pizza

0 Eggs - Lunch:  Cheese and crackers with apples

0 Eggs - Dinner:  Restaurant style hot chicken sandwiches with gravy homemade french fries and peas, made with leftover rotisserie chicken

0 Eggs Used

----------------------------------------------

Tuesday April 22nd

0 Eggs - Breakfast:  Oatmeal with raisins

0 Eggs - Lunch:  Ham and cheese sandwiches, vegetable sticks with dill dip

0 Eggs - Dinner - Pork Chops, rice, peas

0 Eggs Used

----------------------------------------------

Wed April 23rd

2 Eggs - Brunch (midweek brunch = luxury of working from home):  Homemade Buttermilk Pancakes, Sausage

0 Eggs - Dinner:  Steak Fajitas, Rice

2 Eggs Used

----------------------------------------------

Thurs April 24th

3 Eggs - Breakfast:  Spice Muffins, Fruit Salad

3 Eggs - Hard boiled eggs, vegetable sticks and dill dip

3 Eggs - Dinner:  Meatloaf, mashed potatoes, mushroom and onion gravy, green beans

9 Eggs Used

----------------------------------------------

Fri April 25th

6 Eggs - Breakfast:  Potato Pancakes topped with Poached Eggs, Bacon

0 Eggs - Lunch:  Celery and apples with peanut butter, Spice Muffins

0 Eggs - Dinner:  Leftover meatloaf and gravy, mixed vegetables

2 Eggs - Cooked and fed to the dogs

8 Eggs Used

----------------------------------------------

Sat April 26th

4 Eggs - Breakfast:  Sausage and eggs on biscuits

0 Eggs - Lunch:  Spice Muffins, cheese, cantaloupe

0 Eggs - Dinner:  Cheeseburger Casserole, Green beans

4 Eggs Used

----------------------------------------------

Sun April 27th

8 Eggs - Scrambled eggs for the chickens

4 Eggs - Breakfast:  Toasted Western Sandwiches

0 Eggs - Lunch:  Tuna Salad Sandwiches, carrot and celery sticks

0 Eggs - Dinner:  Leftover Meatloaf sandwiches with barbecue sauce, homemade french fries, salad

12 Eggs Used

----------------------------------------------

Total:  35 eggs Used


Potato Pancakes 1 Photo by Tori Beveridge

Potato Pancakes

2 to 3 cups of mashed potatoes
2 Eggs, beaten
1/4 cup flour
1/4 cup parmesan cheese
2 tablespoons minced onion, green onions, or chives

Heat your frying pan while you prepare the pancakes.  Your burner should be set to medium-high.

Combine all ingredients in a mixing bowl.  The mixture will be quite thick and sticky.  Form patties by scooping out the mixture with a large spoon onto a plate, then flatten and shape, using your hands and the spoon.  Repeat until all your pancake mixture is used and your plate is filled with pancakes.

Add 2 tablespoons of olive oil and 1 tablespoon of butter to your heated frying pan and combine them.

Carefully, lift and transfer the pancakes from the plate to the frying pan and saute for about 3 minutes until golden brown on the bottom, then flip and saute the other side.

Remove from pan to serving plate or individual plates.  Serve with sour cream or top with a poached egg as I did.  Bacon goes really well with them.

Enjoy!

Potato Pancakes 2 Photo by Tori Beveridge


Friday, June 21, 2013

Mulberry Madness

Mulberries, Photo by Tori Beveridge

Last week, while picking radishes and lettuce from the garden, I noticed our mulberries were starting to ripen.

Radishes and mulberries Photo by Tori Beveridge AHWT

A few found their way into my basket, but it was obvious I was going to need to come out with baskets and bowls just for the berries.

Last year, because it was so hot and dry, there were barely enough mulberries for the birds and wild animals.   This year the trees are laden.  We've been picking every day, twice a day and have picked and frozen pounds and pounds of these delicious berries.

We always keep some fresh to snack on and to cook with.

The very first quart we picked, went straight (after rinsing)  into my 8 x 8 pan, ready to be made into cobbler.

Mulberries in the pan, Photo by Tori Beveridge

Yes, you can leave the little green stems on, thank goodness!

This is my favorite Mulberry Cobbler recipe.  It has a delicious shortcake like crust and the mulberries cook up sweet and juicy underneath it.  I originally got the recipe from Circle B Kitchen, HERE, and made a few slight changes to it.

Mulberry Cobbler


1 qt mulberries 
2 tablespoons lemon juice (one small lemon)
3 tablespoons sugar
1 tablespoon cornstarch
2 tablespoons water (if  using frozen berries, eliminate the water)
1/4 tsp salt
1 tablespoon butter

Topping:
1 1/3 cups flour
2 tsp baking powder
1/2 tsp salt
1/4 cup sugar
1/2 cup lard or butter
1/2 cup milk

Preheat the oven to 425 degrees.

Place mulberries in an 8 x 8 pan.

In a small bowl combine the lemon juice, water, cornstarch, salt and sugar.  Stir until the cornstarch is dissolved.  Microwave for 30 seconds.

Pour the cornstarch mixture over the berries in the pan.  Mix gently.  Cut the butter into small pieces and dot the top of the berries with them.  Set aside.

In a medium bowl combine the flour, baking powder, salt and sugar.  Cut in the lard or butter with a knife or pastry blender, until the pieces are the size of small peas.  Slowly add the milk, stirring until a soft dough is formed.  Form into a ball and knead on a floured board for 20 to 30 seconds. Roll the dough out to the size of your baking pan.  Dough will be 1/2 to 3/4 inch thick. 

Place the dough on top of the berries.  Cut 2 or 3 slashes on the top for steam to escape and sprinkle the top with a little more sugar.

Bake for 20 minutes.  Let cool at least 30 minutes before serving.  We like it completely cooled.

Delicious plain or serve with a scoop of vanilla ice cream or a dollop of whipped cream.

Mulberry Cobbler, Photo by Tori Beveridge

I've made three cobblers since we started our harvest.  They don't last long around here.

I also made Mulberry liqueurs, one batch with vodka, one batch with brandy.

Mulberry Liqueurs, Photo by Tori Beveridge

They won't be ready until September.

And, yes, of course I've made Mulberry Jam.

Mulberry Jam, Photo by Tori Beveridge


Mulberries do not have a lot of natural pectin, so the jam tends to be more saucy than other jams.  This makes it perfect for topping pancakes, soaking into biscuits and topping ice cream.  Some people strain their jam of the fruit and seeds to make jelly, but I like to keep them in.  The seeds which rise to the top when you make the jam, stir easily through the jam once opened and don't rise back up.

So, what do I do when I have plenty of eggs and Mulberry Jam?

Eggs and mulberries, Photo by Tori Beveridge

I make fresh popovers and jam!  Perfect for brunch or tea.

Popovers and Mulberry Jam, Photo by Tori Beveridge

My husband has requested a Mulberry Pie for dinner tonight, so I must be off.  I hope you're enjoying mulberry season too.

I'm linking to:

From The Farm Blog Hop

Sunday, March 17, 2013

Tea and Shamrocks

Happy St. Patrick's Day!

Today, like everyday, I'll be using my "shamrock" teapot, which I love.  It was a gift from my Mom.

My Shamrock Teapot Photo by Tori Beveridge AHWT


Did you know that the word shamrock derives from the words, "seamair óg", which means young clover?  We have an abundance of clover on our property, much to the delight of our chickens and other people's horses and cows. (which really is another blog post entirely...escaped animals make a bee line to our clover fields)

I know that many people are drinking green beer and Irish whiskey today, but I'll be drinking tea and I'll be in good company.  By capita, the Irish consistently drink more tea than any other country in the world.  (although rumor has it that Iraq is on par with them or even supassing them now)  Yes, they even drink more than their neighbors in England.

My Shamrock Teapot Top Photo by Tori Beveridge AHWT


In Gaelic "cupan tae" means cup of tea, and in Ireland it's a strong cup. Irish tea is blended to be mixed with a lot of rich milk. The custom is to add the milk to the tea cup first along with sugar if desired, then pour in the tea, which is how I was taught to make it.


"Life is like a cup of tea, it's all in how you make it."  Irish proverb


Of course there are always those who like it even stronger and for them there is Irish Tea.


Irish tea?  Why not?  There's Irish Coffee. Irish Tea is as simple as some freshly brewed hot tea and a shot of good Irish whiskey.

Irish Tea

1 tbs loose tea, or 1 tea bag
1 oz whisky
1 oz milk or cream
1 tsp sugar
Preparation:

Brew tea in hot water for 3-5 minutes.  Remove tea leaves or bag. Add whiskey and other ingredients.

My Shamrock Teapot Spout Photo by Tori Beveridge AHWT


However you like your tea, enjoy a cup today.  You'll be in good company.

'Sláinte!'


Tuesday, July 10, 2012

Tasty Tuesday - Saltine Toffee

We were in the mood for something sweet today.  Mr B. likes chocolate.  I like toffee.  Solution?  This delicious and easy candy, made using ordinary saltine (soda) crackers.


Saltine Toffee

Preheat oven to 400 degrees

Line a cookie sheet with tin foil, shiny side up.  Fill the sheet with a single layer of saltine crackers.  About 40 should do it.

In a saucepan melt 1 cup of butter.
Add I cup of brown sugar.
Bring to a boil and boil for 3 minutes.
Pour over your crackers and spread to completely cover them.

Pop in the oven and bake for 6 minutes.

Remove from the oven and sprinkle with 2 cups of semi sweet chocolate chips.  Wait for about two minutes until they begin to melt and then spread the melted chocolate over the top with a spatula.  You'll probably want to rush the waiting for them to melt part, you can't.. just wait..they'll melt.

Sprinkle with finely chopped pecans.

Let cool completely then break into pieces.  


Enjoy!

Tuesday, July 3, 2012

Tasty Tuesday - 10 Tasty Tidbits To Eat When It's Too Hot To Cook

It's too hot to cook!  

I truly wanted to bake something beautiful to take pictures of, but it's just too hot.

Living the middle of nowhere we don't have pizza or chinese food delivery.

Which is why I'm sharing 10 tasty tidbits, that I like to munch on when it's too hot to cook.

10 Tasty Tidbits To Eat When It's Too Hot To Cook


1 - Celery and peanut butter

2 - Celery and cream cheese with a sprinkle of cayenne pepper on it

3 - Frozen grapes

4 - Popcorn made in the microwave with no oil or butter

This is the exact popcorn maker that I use.  You can find it here

5 - Cheese and crackers

6 - Raw veggies or crudites or whatever you'd like to call them.  Ranch dip is always good with them if I'm in the mood.

7 - Cole Slaw

8 - Ham or prosciutto wrapped around a slice of cantaloupe or cheese

9 - Sliced apples served with this Caramel Dip = Instant Caramel Apples  

Caramel Dip

Add 1/4 cup of brown sugar and  1 tsp of vanilla to a small block (4 oz) of cream cheese softened. Add more brown sugar if desired.  Mix well and serve with sliced apples

10 - Chocolate Sundaes using this chocolate syrup which my Mom remembers being in the fridge when she was growing up.  It's a good thing to keep on hand. Why buy it when you can make it?


Chocolate Syrup ( makes 3 cups or 24 oz)

1 cup cocoa
2 cups sugar
1/8 tsp salt
2 cups boiling water
1 tsp vanilla

Combine the cocoa, sugar, salt and water in a pot and mix.  Stirring constantly, bring to a boil and boil for 1 minute.  Cool slightly and add the vanilla and stir well.  Store in a tightly covered jar in the fridge.

Use 2 tsp of syrup to an 8 oz glass of milk or 2 tbspns over ice cream.  Yumm.

What do you like to eat when it's too hot to cook?

Tuesday, June 26, 2012

Tasty Tuesday - 2 Ingredient Lemon Bars

This morning, I decided to make Toasted BLCTs for breakfast.  That's Toasted Bacon, Lettuce, Cheese and Tomato Sandwiches.

Mr B. LOVED them.  He loves bacon and always enjoys bacon sandwiches of any kind, but this morning he was apparently blown away by this ordinary sandwich.  "That's the BEST BLT I've ever had."  He exclaimed.  "Never mind all that Tasty Tuesday stuff you were going to post today, you have to post the recipe for these."

LOL  Well, I didn't DO anything different than usual, but I did cook up different bacon.  Steakhouse seasoned bacon.  Thick sliced.. always thick sliced.  So, apparently, that's the secret to a superb bacon sandwich.  I thought I'd pass on the secret to all of you, if you have a bacon lover in your house.

It turns out, that I'm two for two today, because Mr B. also really likes the 2 Ingredient Lemon Bars that I'm sharing with you.

I saw these on Pinterest and pinned them onto my DELICIOUS board of recipes that I want to try.  I have so many recipes pinned, that I thought it was about time to start trying some of them.  The recipe originally came from Practically Living .

2 Ingredient Lemon Bars

These bars are not like cake despite being made from a cake mix, so do not expect them to raise up like cupcakes.  They will be thinner, dense and moist, like a cross between a brownie and a cookie bar.

The 2 ingredients in 2 Ingredient Lemon Bars

Preheat oven to 350 degrees.

Mix gently, just until cake mix is moistened:

1 Angel Food Cake Mix - Just add water kind (any brand)
1 15 oz can of Lemon Pie Filling (any brand)

Don't over mix.
Spread into an ungreased 9 X 13 inch cake pan.

Bake for 25 to 35 minutes or until golden brown on top.

Dust with powdered sugar when you take them out of the oven if desired.  I chose to skip this and they were quite sweet enough without the extra sugar.  It would look pretty though.

Let cool completely in the pan before cutting.

2 Ingredient Lemon Bars


Delicious alone with a cup of tea or coffee.  Try serving with blueberries or with a twist of candied lemon peel on top.

Enjoy!

Tuesday, June 19, 2012

Tasty Tuesday - Tzatziki

I love greek food.  I especially love tzatziki, the cool, creamy, garlicky sauce that accompanies souvlaki and is great as a dip with pita and raw vegetables.

Yogurt and cucumber star in Tzatziki

Tzatziki

2 cups of plain yogurt, drained  (Greek yogurt is best and doesn't require draining - it's already thick)
2 cloves of finely chopped garlic (chop your garlic on a little salt, the salt will absorb the garlic juices, so none goes to waste)
2 medium cucumbers, peeled, seeded, diced and drained
salt
1 tblspn of lemon juice
1 tblspn finely chopped fresh dill

To drain the yogurt, put it on 2 or 3 coffee filters in a colander over a bowl and let sit for about 2 hours.  You want it thick like sour cream.

To drain the cucumber, salt it and leave it in a colander for about half an hour to release the moisture.

Combine all ingredients and mix well.  Refrigerate for at least two hours to allow the flavors to blend.

Serve with grilled meats, pita triangles or fresh vegetables.

Enjoy!

Tuesday, June 12, 2012

Tasty Tuesday - Salmon Chowder

If you're a soup fan and like salmon, you're sure to like this delicious Salmon Chowder.  It's thick and hearty enough to be a stand alone dinner or serve a small bowl of it with a sandwich or salad for lunch.

Salmon Chowder At Home with Tori
Salmon Chowder

Salmon Chowder


1 cup of chopped onion
2 celery ribs thinly sliced
2 tblspns butter
2 tblspns flour
1 tspn salt
1/2 tspn dill
4 cups milk
2 cups of fresh or frozen cauliflower, chopped and cooked
1 large 14 3/4 oz) can of salmon, drained, skin and bones removed
1 10 oz pkg frozen peas thawed
1/2 cup grated swiss cheese
1/2 cup grated cheddar cheese

In a large pan or dutch oven, saute the onions and celery in the butter until soft.  Stir in the flour to make a roux and continue to cook for a minute to cook the "floury taste" out of the flour.  Add the salt and dill.  Stir in the milk and keep stirring while you bring it to a boil.  It will thicken.  Turn the heat down to medium-low.  Add the cauliflower, peas and salmon and heat through.  Stir in the cheeses, until melted.

Serve immediately.  (4-8 servings)

Enjoy!


Tuesday, May 29, 2012

Tasty Tuesday - Cherry Cola Salad

This past weekend was HOT!  It was over 100 degrees in the sun and humid.  Perfect weather for a nice cool dessert, like this Cherry Cola Salad.

Cherry Cola Salad


 I don't know why it's called a salad.  I guess it's because of the cherries... like a fruit salad.  Regardless of it's name, it's very very cherry and very very easy to make.

Cherry Cola Salad

1 - 6oz pkg of cherry gelatin
1 1/2 cups of boiling water
1 1/2 cups of cola (1 can of cola)
1 can (21 ounces) of cherry pie filling
Whipped cream or topping (optional, unless you're me and then it's mandatory)

Dissolve the gelatin in the boiling water.  Add the cola. Watch it fizz!  Stir in the cherry pie filling.
Pour into an 8 inch square baking pan.  Put in the refrigerator until firm.
Cut into 8 or 10, serve.  Add whipped cream or topping.

Enjoy!

Cherry Cola Salad
Yes, this is my piece... lots of whipped cream.
You can also make a diet version of this.  Use sugar free gelatin, diet cola and lite pie filling and lite topping.

Tuesday, May 22, 2012

Tasty Tuesday - Italian Casserole

When I don't want spaghetti, I make this casserole.  It's a spin off of lasagna, which Mr. B isn't so fond of.  He does, however, like this and he especially likes that there are always lots of leftovers, which he thinks taste better than the first night.

Italian Casserole
Italian Casserole - Hot and bubbly from the oven.


Italian Casserole


Preheat oven to 350 degrees.  Lightly oil your casserole dish with olive oil.

Bring a pot of water to boil for your pasta.  I used shells, use rotini, macaroni, whatever you have.   One box of pasta will be more than enough.

While the water is boiling and the pasta is cooking, make your sauce:

In a pan combine:

1 lb ground beef
1 onion chopped
1/2 green pepper chopped
4 cloves of garlic chopped

Drain the fat off

Add and simmer:

1 - 24 ounce jar of spaghetti/tomato sauce or 3 cups of your homemade spaghetti sauce
1 tspn oregano
1 tspn basil
1/2 tspn thyme
1/2 tspn lightly crushed fennel seeds ( just lightly broken so they'll release their flavor)

sauce and pasta simmering
Sauce and Pasta Simmering


Drain your pasta and put it in the casserole.

Pour the sauce over the top, along with:

1 cup small curd cottage cheese

Stir together lightly until pasta is coated and cottage cheese is well distributed.

Top with:

2 cups (approx) grated mozarella cheese
1 tbspn finely chopped parsley

Bake for 30 minutes until cheese is bubbly and golden brown.

Serve and enjoy!


Saturday, May 19, 2012

The Cookbook I Love - They Draw and Cook

This is going to be one of those posts where I've removed the girl from the art blog but I can't remove the art from the girl.  I say this because the new cookbook that I'm so in love with satisfies both my love of food and cooking, and my love of art.  Here it is:

They Draw and Cook, presented by Nate Padavick & Salli Swindell

"They Draw and Cook" has 107 recipes illustrated by artists from around the world.  The recipes were also all written by the artists, not by chefs in fancy hats, or celebrities from television (unless of course they are an artist too).  The result is charming and original and very different.  Don't expect every recipe to have neatly laid out ingredient lists and directions.  Think instead of a little work of art on each page and the recipe is part of it.

A peek inside "They Draw and Cook"

Each page is delightful and the recipes look delicious... well they sound delicious.  You don't see the finished product in this cookbook, but I don't miss seeing it.

If you have young budding cooks at home, they would love this cookbook.  I think it would make children want to cook.

But, wait.. I haven't told you the best part.. you don't have to own the cookbook to see all the recipes inside the book.  There is a website:  They Cook and Draw  where you can find every recipe in the book plus many many more.  I browse through there in heaven.. it's part art gallery, part cooking site.  Click on a recipe to bring up a page devoted to it, where you can print the recipe, download high res versions of the recipe, buy prints of the recipe, and comment on the illustration and the recipe itself after you've tried it.

On the website there is even a Dial a Dinner Page  which you can use like a slot machine to randomly give you an appetizer, a main course and a dessert recipe to make for dinner!  I could play with it for ages.  Oh.. and there is a vegetarian version of it too.

If you're an artist, you can submit your illustrated recipe to them for inclusion on the site.  Guess what I'm going to be doing?  Artists go to the Submit a Recipe page on the They Cook and Draw site to find out all the particulars.

There is a shop of course, where you can buy the cookbook and other items, like prints of the recipes and other products.

In short, this book and the website is nothing but pure fun and fancy.  It's proof that you can have fun cooking. 

Tuesday, May 15, 2012

Tasty Tuesday - Tori's Toasty Tuna Sandwiches

Everyone has their own favorite tuna sandwich recipe.  This one is mine.  The sandwiches are toasty on the outside and warm and delicious on the inside and very messy to eat, especially if you pile them high with the tuna filling like I do.  Lots of napkins are suggested and a fork, or lots of carrot sticks and potato chips to scoop up what oozes out of the sandwich and on to your plate.

Tori's Toasty Tuna Sandwiches

Tori's Toasty Tuna Sandwiches

Serves 2 to 4 depending on how high you mound the filling.  Preheat oven to 375 degrees.

Mix together:
1/4 cup finely chopped sweet pepper (green, red, yellow, orange, whatever you like)
1/3 cup finely chopped onion
1 hard boiled egg, chopped
1/2 cup grated cheese
1 can of tuna, drained
1/3 cup mayonnaise
a sprinkle of salt and pepper

Mound your filling onto your rolls.  (kaiser, chiabatta, subway..what's your pleasure?)
Wrap and seal each roll in a square of aluminum foil, shiny side facing the sandwiches, and place on baking sheet.
Bake for 25 minutes.

Unwrap and enjoy!

Tuesday, May 8, 2012

Tasty Tuesday - Walnut Sour Cream Coffee Cake

Walnut Sour Cream Coffee Cake, fresh from the oven.  I wish you could smell it.
Today's recipe is another family favorite.  My Mom calls this coffee cake "divine", so I thought it would be perfect to share with you before Mother's Day.  It would be perfect for brunch with strawberries and eggs benedict.


Walnut Sour Cream Coffee Cake

Preheat over to 350 degrees.  Grease a 9" x 13" x 2" pan.  You'll need 3 bowls.

Topping - Mix and set aside:

1/2 cup brown sugar (packed)
4 tbsn white sugar
1 tsp cinnamon
1 cup chopped walnuts

Cake:

1 cup butter (2 sticks)
1 cup sugar
2 eggs
1 tsp vanilla
1 cup sour cream
2 cups flour
1 tsp baking soda
1 tsp baking powder
1/2 tsp salt

Cream butter and sugar together.  Add eggs and vanilla.

Combine the dry ingredients and add them to the butter mixture alternately with the sour cream. ( always start with the dry ingredients, then add some sour cream, then dry.. etc)

Spread half your batter in the pan.  Sprinkle with half the topping.  Repeat.
Spread half of your cake batter into the pan and sprinkle with half of the topping.  Spread the rest of the batter on top and cover with the remaining topping.

Bake for 40 minutes.  Remove from oven and cool.  Cut into squares or rectangles.

Walnut Sour Cream Coffee Cake.  Enjoy!


Enjoy!!

Tuesday, May 1, 2012

Tasty Tuesday - Roast Pork Loin with Roasted Vegetables


Tonight, called for something easy to make.  One of the easiest meals to make is a roast dinner.
The results make it taste and look like you spent all day cooking, but I won't tell anyone how little effort you really put into this meal.  It will be our little secret.

Roast Pork Loin with Roasted Vegetables


Preheat your oven to 400 degrees.

1 - 3lb  Boneless Pork Loin Roast
3-4   Potatoes, peeled and cut into halves or quarters depending on size
1 large onion, cut into eighths
Baby carrots - a few per person
Asparagus - fresh or frozen 
Olive Oil
1 tspn or to taste of Garlic Powder
Salt and Pepper
1 tspn or to taste of Thyme

Lightly grease the bottom of your roasting pan with olive oil.  I use the bottom of my broiler pan for roasts.  Put your roast in the pan, fat side up.  The fat will run down and baste the meat as it cooks.
Place the onions, potatoes and carrots into a bowl and drizzle some olive oil over them.  Toss them gently with your hands until they are well coated with the olive oil, then place them around the roast.  Sprinkle the roast and vegetables with garlic powder, salt, pepper and thyme.

Boneless pork loin in lightly oiled pan with vegetables and seasonings

Pop the roast into the 400 degree oven.  We're going to sear the pork to seal the juices in and give the outside a bit of a nice crispiness.  Set your timer for 10 minutes.  When the 10 minutes is up, turn the oven temperature down to 350 degrees.  

Continue to cook for another 30 minutes then take the roast out of the oven  and turn the vegetables and add your asparagus.   Drizzle a little more olive oil over the asparagus and a little on the pork.

Add your asparagus to your roasting pan


Put the pork back into the oven and continue cooking for 40 minutes.  Go and relax, play with the kids, watch tv, spend time with your significant other.  Pork usually takes 20 minutes a pound, but it will cook more slowly with the vegetables surrounding it, so we add an extra 20 minutes.

Remove the roast pork and vegetables from the oven.

Serve.

Roast boneless pork loin with roasted vegetables.  Delicious!

Enjoy!

 Happy May Day!